How to Use Discord Components v2 with Discord.js
In March 2025, Discord released Components v2, a great improvement to the message components system. Before Components v2, a bot could send embeds or text, but it had very limited control over the layout. With Components v2, messages are constructed entirely using components. This unified approach eliminates the use of traditional message content and embeds, offering developers greater flexibility in designing message layouts.
Rather than describing everything Components v2 offers, let's learn by example. We'll create a simple bot using the Discraft bot framework, a lightweight CLI for bootstrapping Discord.js bots that will do all the boilerplate work for us so we can focus on building components.
(Or, if you just want to know what changed in Components v2, you can skip to the TL;DR 😉)
Note: This article assumes you have a basic understanding of JavaScript and Discord.js. Also, while the article primarily focuses on using Components v2 with application commands, you can use the same techniques with text messages!
Creating a Bot
If you already have a Discord.js bot, you can skip directly to the Components v2 with Discord.js section. However, the tutorial assumes that your bot is using the Discraft bot framework, so you may need to modify some of the code examples to fit your bot's structure.
First, install the Discraft CLI globally (or skip this step and run it with npx). Run:
npm install -g discraftIn this tutorial, we are using Discraft 1.7.7.
Next, let's initialize a new JavaScript bot using Discraft:
discraft initWhen prompted, choose the "JavaScript" template. Then, name the directory whatever you'd like (e.g., components-v2-bot) by selecting "Custom directory".
At the end of the initialization process, Discraft should give you some steps like this:
- cd components-v2-bot
- Configure your .env file with your bot token
npm run devto start the bot in development mode
You should follow the instructions to complete the setup process:
cd components-v2-botYour .env file should contain the bot token and ID, which you will receive after creating a new bot application on the Discord Developer Portal. You should never share your bot token.
# Create a .env file with this content
# From `Bot > Token` | https://discord.com/developers/applications
DISCORD_TOKEN='secret_token_here'
# From `General Information > App ID` | https://discord.com/developers/applications
DISCORD_APP_ID='bot_id_here'
Start the development server:
npm run devYou should see some logs in the terminal confirming that your bot is online!
Now it's time to invite the bot to a server. There are a couple of things we should do first to prepare the bot for installation.
- Set
application commandandbotscopes in the Discord Developer Portal:
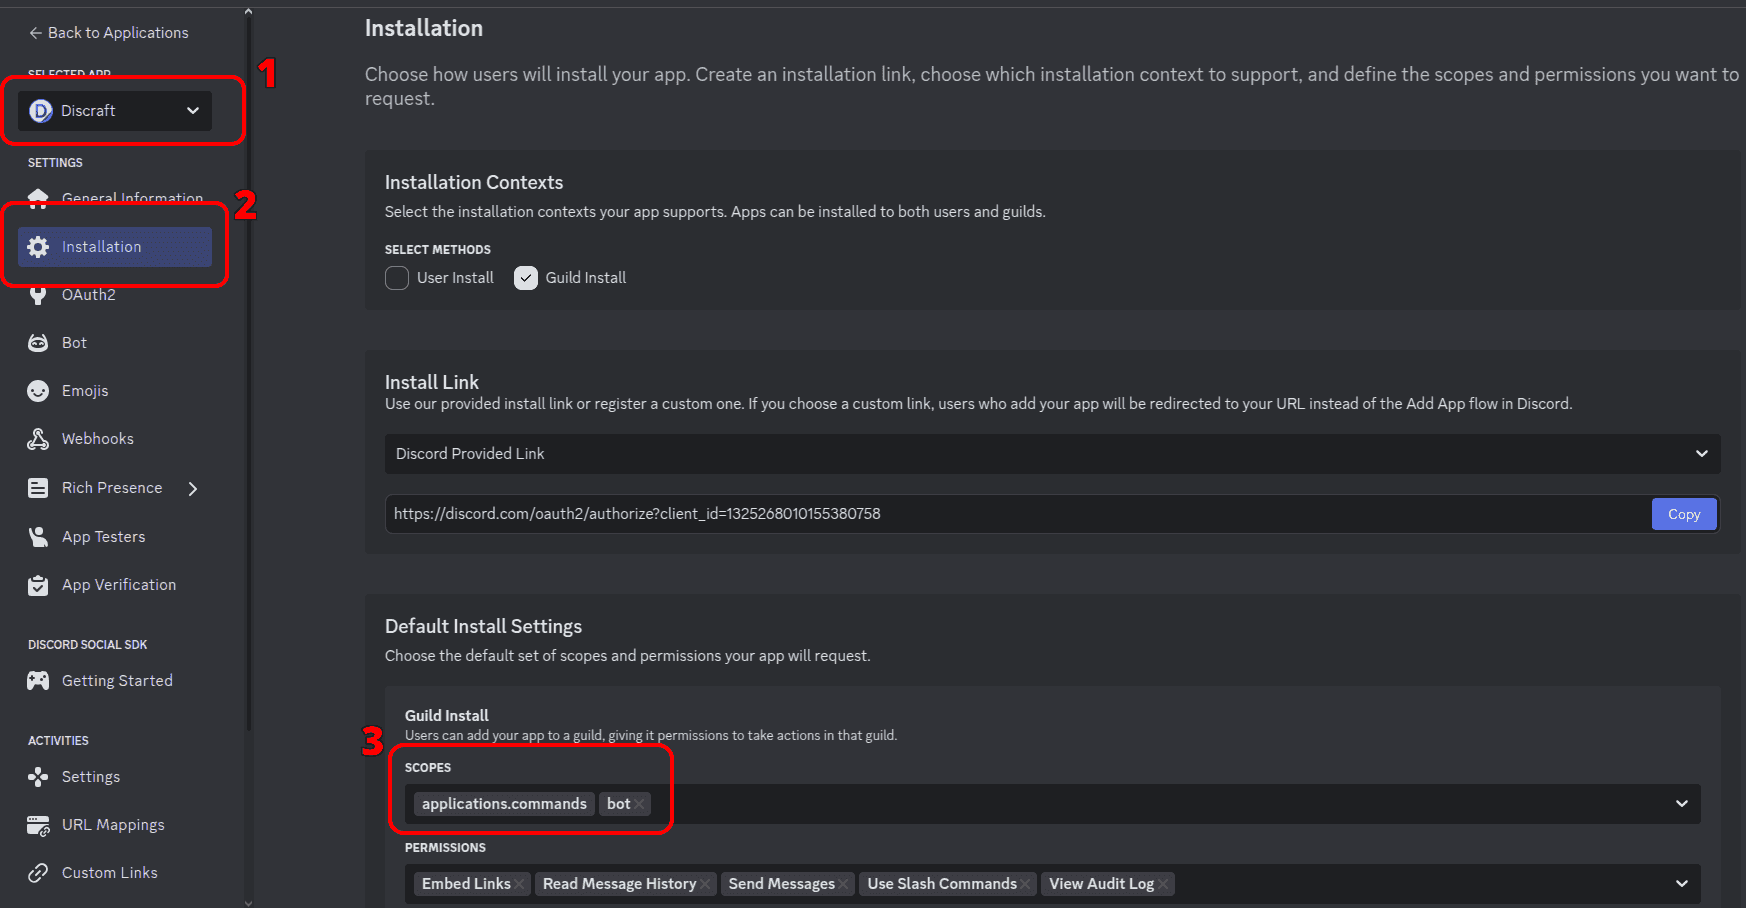
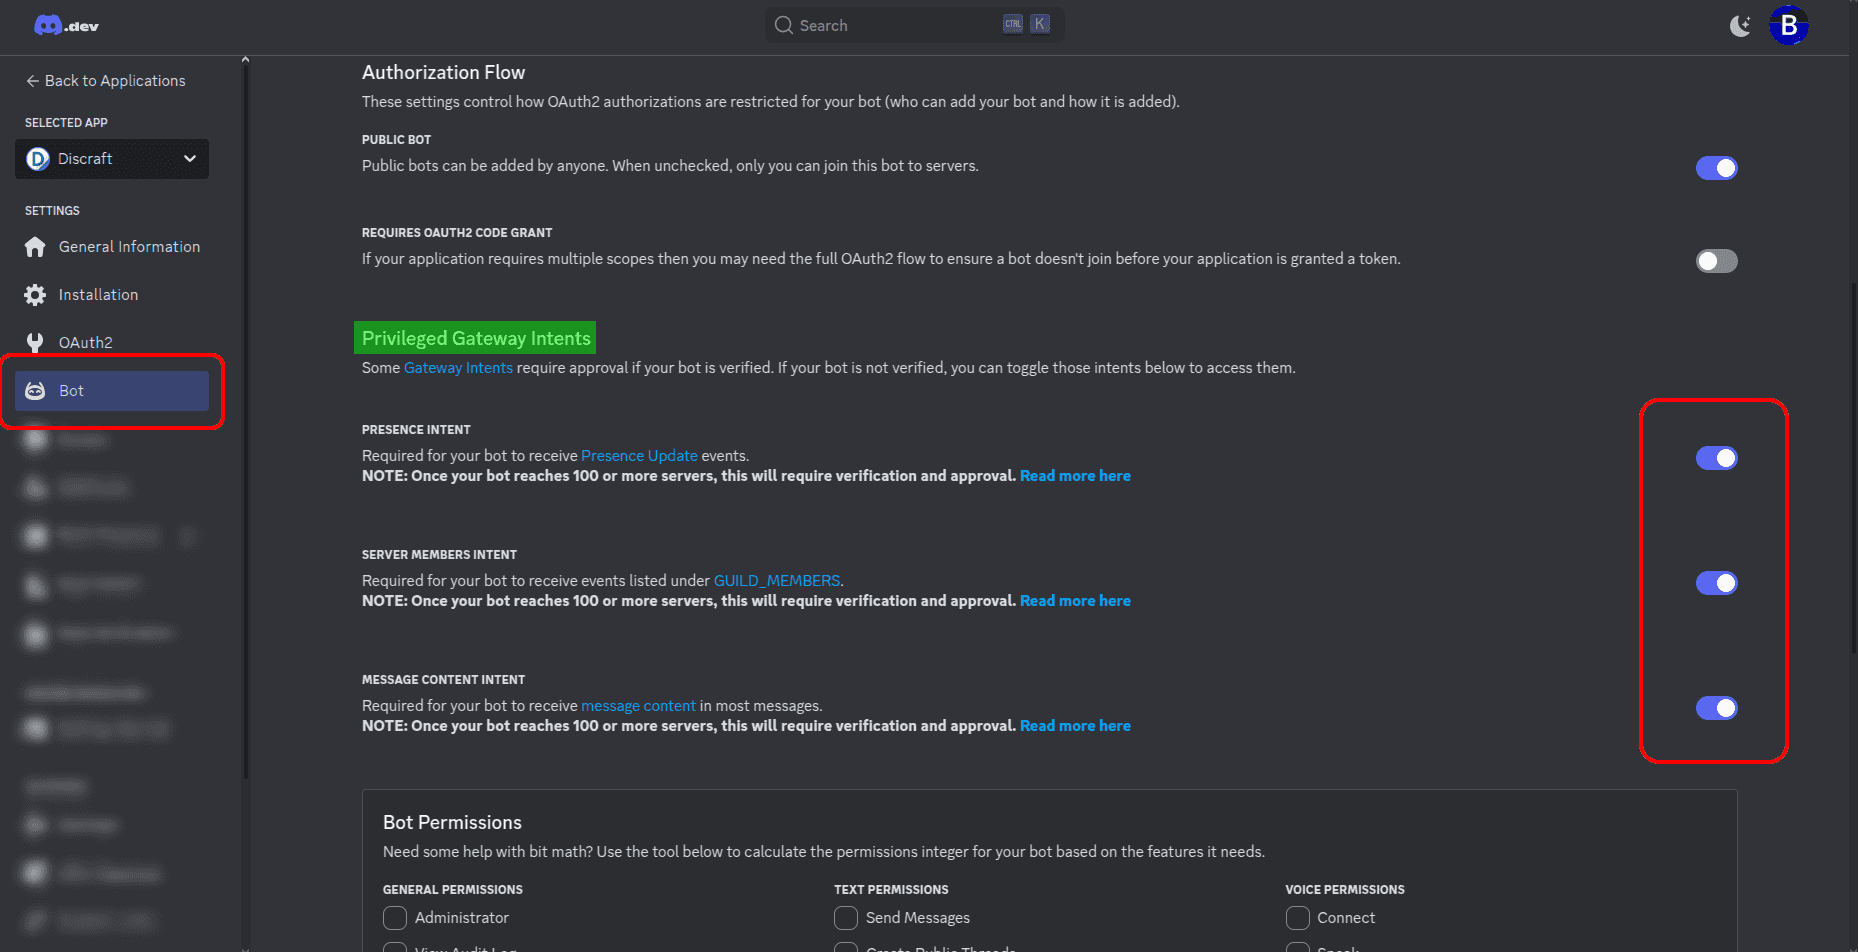
- Give the bot all three privileged gateway intents:
Fill in your bot's Client ID below to get an invite link and invite the bot to a server:
Remember that you must have the "Manage Server" permission to invite bots to a server.
Understanding the Bot Structure
The Discraft JavaScript template automatically created several files and folders for us, so let's make sure we understand what's going on.
If we open the project in a code editor, we'll see a lot of directories and files, but for this tutorial, the most important is the commands directory.
The index.js file is the entry point for the bot, where all the other files come together. If you ran npm run dev or npm run build earlier, you will also find a .discraft folder. It contains command and event index files to automatically register commands and events with Discord when your bot starts up.
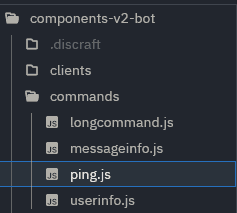
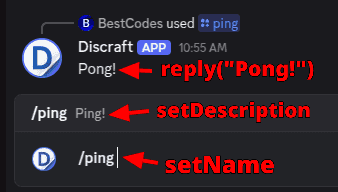
Let's take a look at the commands/ping.js file. It defines an application command (/ping) that responds with "Pong!" when a user runs the command on Discord.
import { SlashCommandBuilder } from "discord.js";

export default {
  data: new SlashCommandBuilder().setName("ping").setDescription("Ping!"),

  async execute(data) {
    const interaction = data.interaction;
    await interaction.reply("Pong!");
  },
};
When the bot starts, it will register a ping slash command on Discord. If we type / in the Discord message box, we'll see a list of bot commands we can run. This image shows what part of the code corresponds to different parts of the Discord command UI:
Now that we understand how the slash commands are defined, let's update the ping command to use Components v2!
Components v2 with Discord.js
Components v2 was recently introduced into Discord.js. This tutorial assumes you are using Discord.js
14.19.3or later. To make sure you have the latest version, runnpm install discord.js@latestin your project directory.
The first step in migrating to Components v2 is to add the IsComponentsV2 flag to our bot interaction response. This flag tells Discord.js to use Components v2 instead of the older version.
import { MessageFlags } from "discord.js";

// ...

await interaction.reply({
  content: "Pong!",
  flags: MessageFlags.IsComponentsV2,
});
If we try to use the ping command at this point, nothing will happen (or the bot will have an error) because we need an array of components to pass to the content field and not plain text. So let's update our file again:
import {
  MessageFlags,
  SlashCommandBuilder,
  TextDisplayBuilder,
} from "discord.js";

export default {
  data: new SlashCommandBuilder().setName("ping").setDescription("Ping!"),

  async execute(data) {
    const interaction = data.interaction;

    const components = [new TextDisplayBuilder().setContent("Pong!")];

    await interaction.reply({
      components: components,
      flags: MessageFlags.IsComponentsV2,
    });
  },
};
That might seem pretty boring at first. It does the same thing as our ping command did earlier, just using more code. However, you might have noticed something important: the components constant is an array, so we can put text, buttons, or whatever we want in whatever order we want. We're no longer limited to just embeds or action rows at the end of our messages!
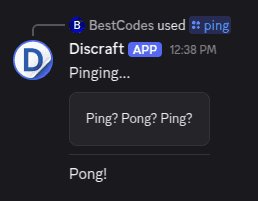
Let's add more components to see it in action:
import {
  ContainerBuilder,
  MessageFlags,
  SeparatorBuilder,
  SeparatorSpacingSize,
  SlashCommandBuilder,
  TextDisplayBuilder,
} from "discord.js";

export default {
  data: new SlashCommandBuilder().setName("ping").setDescription("Ping!"),

  async execute(data) {
    const interaction = data.interaction;

    const components = [
      new TextDisplayBuilder().setContent("Pinging..."),
      new ContainerBuilder().addTextDisplayComponents(
        new TextDisplayBuilder().setContent("Ping? Pong? Ping?"),
      ),
      new SeparatorBuilder()
        .setSpacing(SeparatorSpacingSize.Small)
        .setDivider(true),
      new TextDisplayBuilder().setContent("Pong!"),
    ];

    await interaction.reply({
      components: components,
      flags: MessageFlags.IsComponentsV2,
    });
  },
};
The result:
After a while, building all these Components in code and testing them on Discord gets very tedious. If you want an awesome tool for prototyping Discord messages with Components v2, check out discord.builders.
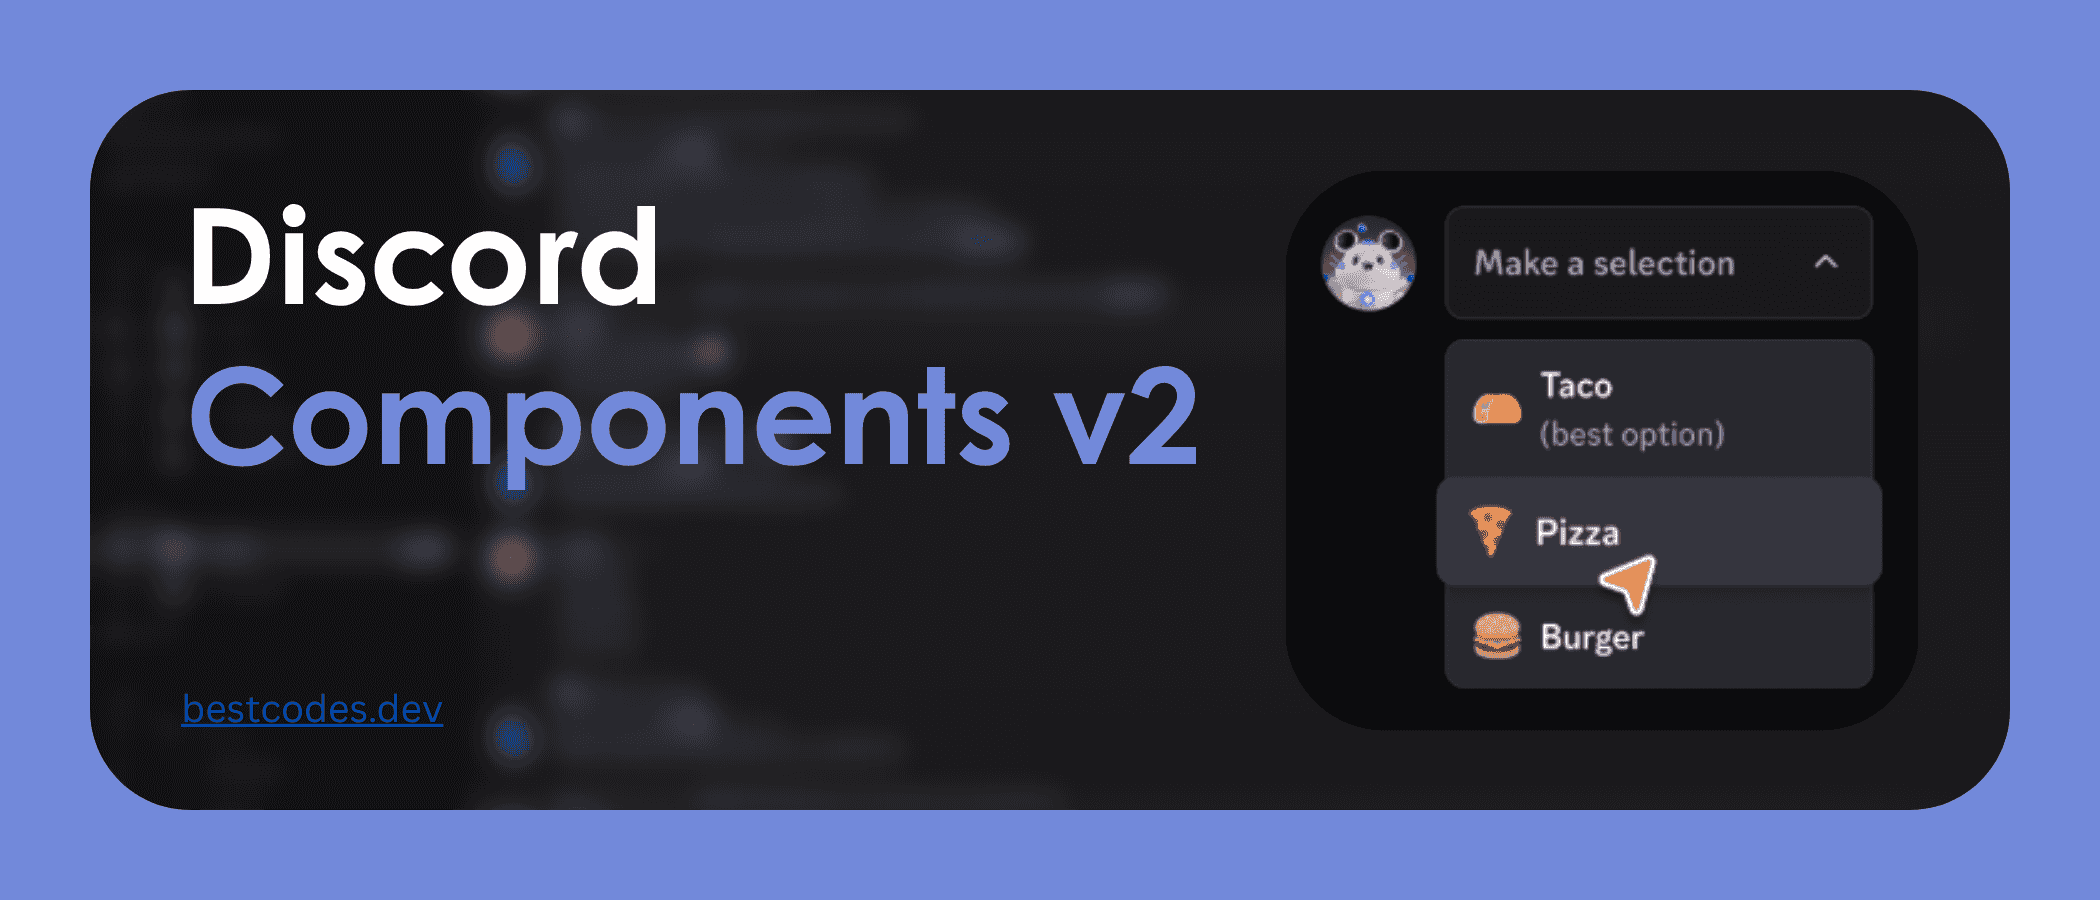
Let's try something a bit more advanced. We'll recreate that select menu you see in the thumbnail of this blog post!
First, create a new file named select-food.js in the commands/ folder. Add this content to the file:
import {
  ActionRowBuilder,
  MessageFlags,
  SlashCommandBuilder,
  StringSelectMenuBuilder,
  StringSelectMenuOptionBuilder,
  TextDisplayBuilder,
} from "discord.js";

export default {
  data: new SlashCommandBuilder()
    .setName("select-food")
    .setDescription("Choose a food to eat :D"),

  async execute(data) {
    const interaction = data.interaction;

    const components = [
      new TextDisplayBuilder().setContent("Which food would you like to eat?"),
      new ActionRowBuilder().addComponents(
        new StringSelectMenuBuilder()
          .setCustomId("discraft-select-a-food")
          .setPlaceholder("Make a selection")
          .addOptions(
            new StringSelectMenuOptionBuilder()
              .setLabel("Taco")
              .setValue("dsaf-taco")
              .setDescription("(best option)")
              .setEmoji({
                name: "🌮",
              }),
            new StringSelectMenuOptionBuilder()
              .setLabel("Pizza")
              .setValue("dsaf-pizza")
              .setEmoji({
                name: "🍕",
              }),
            new StringSelectMenuOptionBuilder()
              .setLabel("Burger")
              .setValue("dsaf-burger")
              .setEmoji({
                name: "🍔",
              }),
          ),
      ),
    ];

    await interaction.reply({
      components: components,
      flags: MessageFlags.IsComponentsV2,
    });
  },
};
After you add a new command, save the file and restart your bot. If you are using the npm run dev command from Discraft, your bot will automatically reload for you. You might also need to reopen Discord or refresh your slash command cache (Ctrl+R on desktop) for the new command to appear.
Run the select-food command and you will see a select menu with options just like we set in the file!
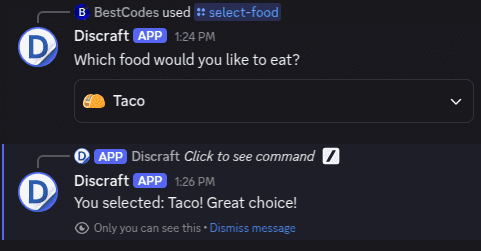
The select menu interaction will fail if you actually make a selection, because we haven't told the bot how to handle the interaction yet. We can easily add an interactionCreate event listener to handle the select menu interactions.
Simply create a new file named interactionCreate.js in the events/ folder:
import { Events, MessageFlags } from "discord.js";
import { logger } from "../utils/logger";

export default {
  event: Events.InteractionCreate,
  handler: async (_client, interaction) => {
    if (!interaction.isAnySelectMenu()) return;

    if (interaction.customId === "discraft-select-a-food") {
      const selectedValue = interaction.values[0];

      let foodName = "";
      switch (selectedValue) {
        case "dsaf-taco":
          foodName = "Taco";
          break;
        case "dsaf-pizza":
          foodName = "Pizza";
          break;
        case "dsaf-burger":
          foodName = "Burger";
          break;
        default:
          foodName = "Unknown food";
      }

      try {
        await interaction.reply({
          content: `You selected: ${foodName}! Great choice!`,
          flags: MessageFlags.Ephemeral, // Only the user who interacted with the menu can see this message
        });
      } catch (error) {
        logger.error(`Error replying to select menu interaction: ${error}`);
      }
    }
  },
};
Now, when you select a food, the bot will respond with a follow-up message!
Conclusion
That's pretty much it... you're now ready to build richer, better bot interactions!
Migrating to Components v2 with Discord.js is fairly easy. If you are curious about all the new components, you can see the list of available components on the Discord API Docs. And don't forget to check out discord.builders, which makes it super easy to mock up messages with Components v2.
TL;DR
The table below shows a quick summary of the main changes between Components v1 and v2:
| Feature | v1 (Old) | v2 (New) |
|---|---|---|
| Layout control | Limited to embeds & action rows | Full control with flexible layouts |
| Message content | Text or embed | Fully component-based |
| Buttons/Selects | Separate from message body | Integrated inline with text |
If you get stuck, you can join the Discraft support server to get help.
Thanks for reading!
BestCodes